Refrigerator compressor repair cost refers to the total investment to diagnose, service, or replace the sealed-system motor that circulates refrigerant. The final figure depends on brand and model complexity, parts availability, refrigerant type, labor time, and warranty coverage. The most accurate number comes from an in-home assessment and a written quote.
Above-Fold Section
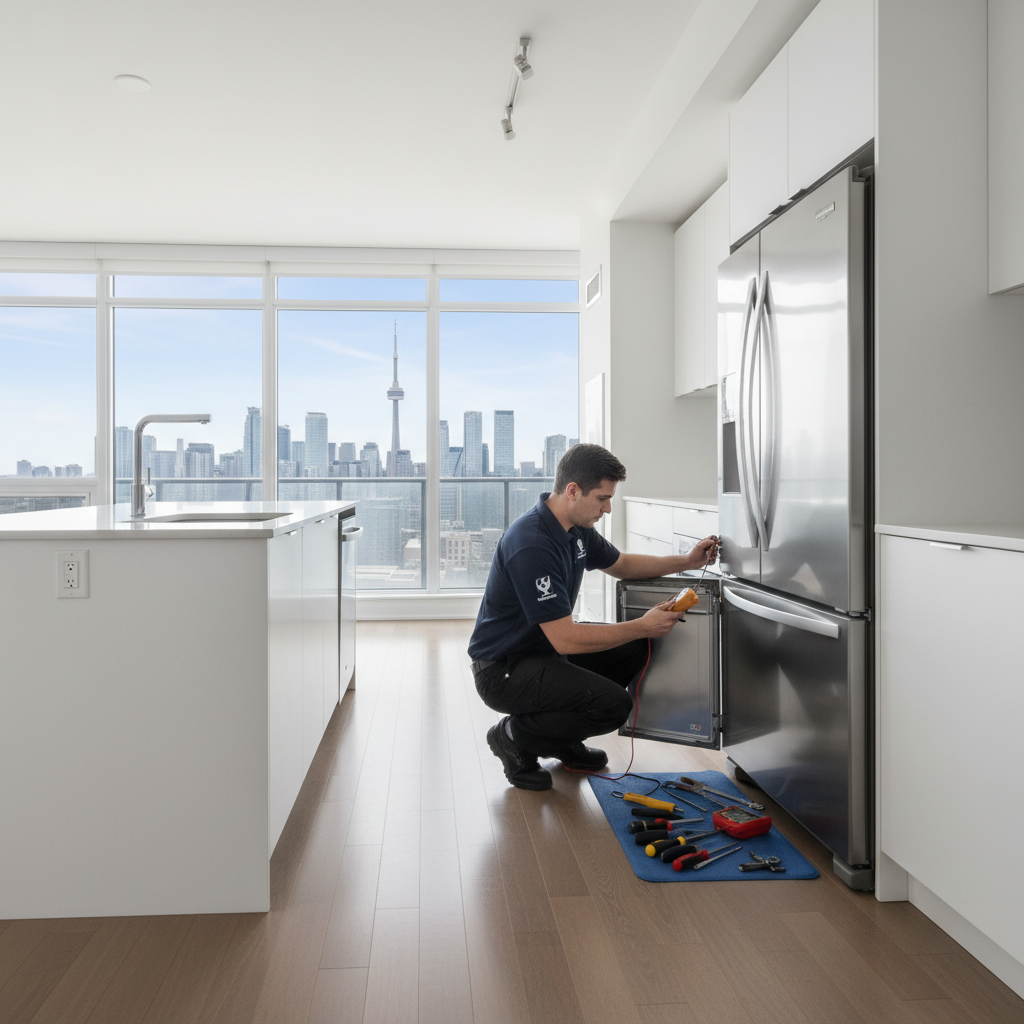
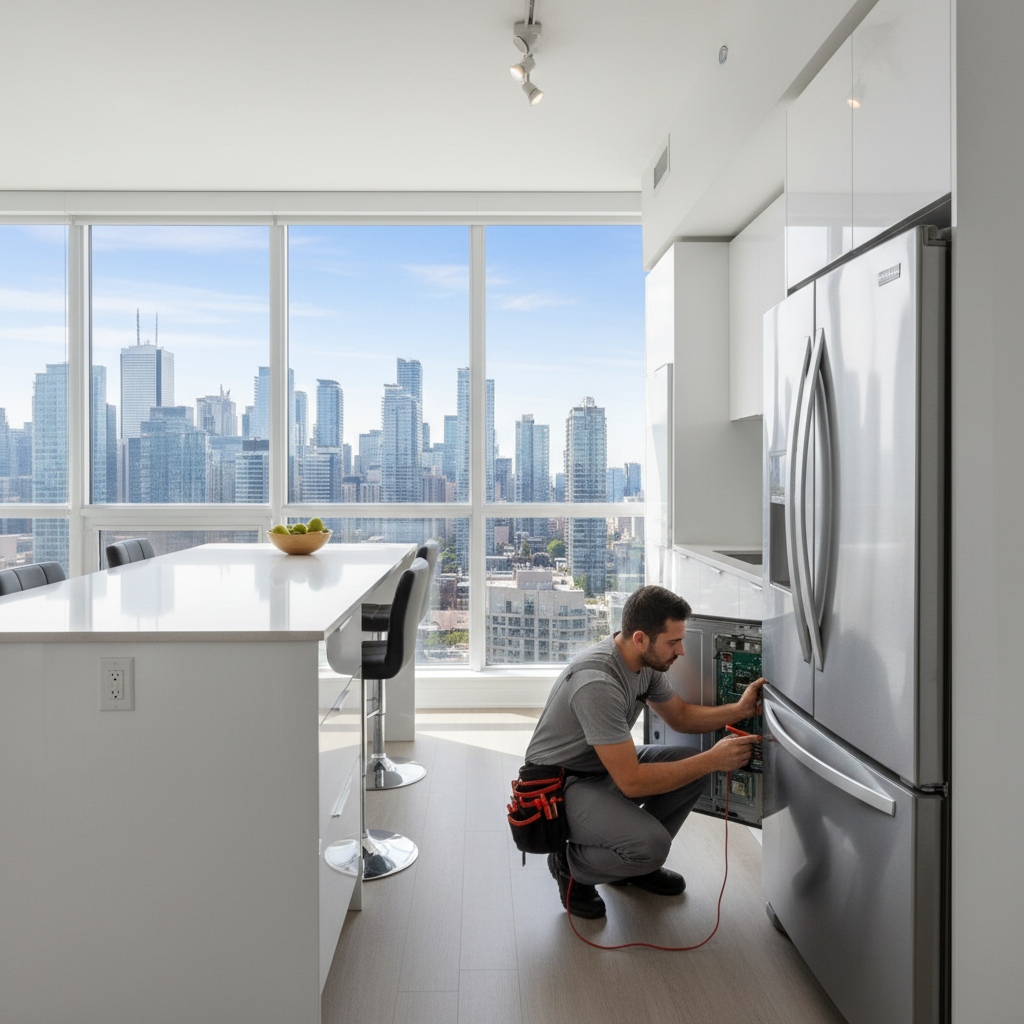
If your fridge is warm or buzzing, the fastest path to answers is a same-day sealed-system diagnosis. Certified technicians verify power, controls, refrigerant pressures, and compressor health before recommending repair or replacement. Expect an upfront, written quote with parts and labor plus warranty terms, so you can decide confidently.
When cooling drops, speed matters. A clear, step-by-step diagnosis protects food and prevents moisture damage in your kitchen. JK Appliances serves downtown condos and GTA homes with licensed, insured, TSSA-certified technicians and a documented process that ends with a written plan and a 180-day parts-and-labor warranty on repairs.
- Know the signs fast: warm fresh-food section, clicking or humming, frequent cycling, or frost on only part of the evaporator.
- Protect your food: move perishables to a cooler; minimize door openings to retain remaining cold.
- Book certified help: sealed-system work requires trained, insured, and (in Ontario) TSSA-certified technicians.
- Expect clarity: reputable providers deliver written findings, brand-specific part options, and clear next steps.
- Value-first lens: weigh age, condition, and warranty against repair scope before you green-light work.
Summary
A smart decision balances food safety, property protection, and long-term reliability. Compressors fail for electrical, mechanical, or refrigerant reasons. The total investment is shaped by brand, refrigerant, part sourcing, and labor complexity. Work with certified techs who document diagnostics and stand behind the repair with a real warranty.
Here’s what this guide covers in plain English and practical steps you can use right now.
- Primary factors: diagnostic complexity, access, refrigerant (R600a/R134a), parts sourcing, and warranty.
- Provider checklist: same-day visits, upfront quotes, 180-day warranty, brand-agnostic expertise.
- Decision framework: appliance age, condition, efficiency, and reliability history.
- Outcome to aim for: fast, accurate diagnosis that preserves food and avoids moisture damage to floors and cabinetry.
Quick Answer
Refrigerator compressor repair cost is shaped by diagnostic findings, brand parts, refrigerant, and labor. Near 18 Yonge St #3509, our JK Appliances team provides same-day sealed-system diagnostics, upfront written quotes, and a 180-day warranty—so Toronto condo owners can decide quickly and protect their groceries.
Local Tips
- Tip 1: In high-rise condos near Union Station and the Gardiner, coordinate elevator booking and concierge access so technicians can reach your unit quickly with sealed-system equipment.
- Tip 2: Summer heat waves strain fridges. If cooling drops before a long weekend, schedule a same-day diagnosis to avoid food loss when stores and deliveries are busy.
- Tip 3: Many downtown suites use R600a (isobutane). Choose a provider trained, insured, and TSSA-certified for sealed-system service and proper refrigerant handling in multi-unit buildings.
IMPORTANT: These tips reflect our condo-heavy service area around 18 Yonge St #3509 and help speed safe, certified service.
What Is Refrigerator Compressor Repair Cost?
It’s the total a homeowner invests to diagnose and remedy a compressor or sealed-system failure. Quotes cover certified diagnostics, parts sourcing, refrigerant handling, and labor. The number varies with brand, model, refrigerant, accessibility, and warranty. A written, in-home assessment is the gold standard for accuracy.
Think of it as the complete path to getting your cold back—safely and reliably. Reliable estimates include the time to test electricals and pressures, confirm airflow and controls, and document findings. In our experience across 10,000+ GTA homes, clarity early on prevents second visits and shortens downtime, especially in condo kitchens with tight access.
- Plain-English definition: the full scope of diagnosing and fixing your fridge’s cooling heart.
- Usually included: on-site diagnostics, sealed-system work (if required), parts, refrigerant, labor, and final performance testing.
- Complexity drivers: built-in cabinetry, counter-depth units, dual evaporators, inverter boards, and limited condo space.
- Why written quotes matter: they define scope, timelines, and warranty so you avoid surprises.
- JK Appliances edge: same-day visits, multi-brand expertise (Samsung, LG, Whirlpool, GE, Bosch, Maytag, KitchenAid, Electrolux, Miele, Frigidaire), 180-day parts-and-labor coverage.
Why Refrigerator Compressor Repair Cost Matters
Understanding cost drivers helps you act before food spoils or moisture damages floors and cabinets. Making a quick, informed choice—repair or replace—often saves more than waiting. Certified diagnostics, clear quotes, and a real warranty create confidence and reduce repeat breakdowns.
The USDA guidance is clear: keep refrigerators at 40°F or below and freezers at 0°F to protect food safety. When your unit can’t hold those targets, every hour counts. We’ve found that fast triage plus a written plan reduces uncertainty, speeds approvals, and keeps your kitchen running—especially during summer heat waves.
- Food protection: rising temps threaten groceries quickly; limit door openings and move perishables to a cooler.
- Property protection: sealed-system failures can drive condensation and leaks that harm flooring and cabinets.
- Avoid guesswork: overlapping symptoms are common; pressure and electrical readings separate facts from hunches.
- Warranty leverage: documented findings support manufacturer or extended-warranty claims.
- Local proof: our 90% first-visit fix rate shows that structured diagnostics cut repeat visits.
How Refrigerator Compressors Work (and Why They Fail)
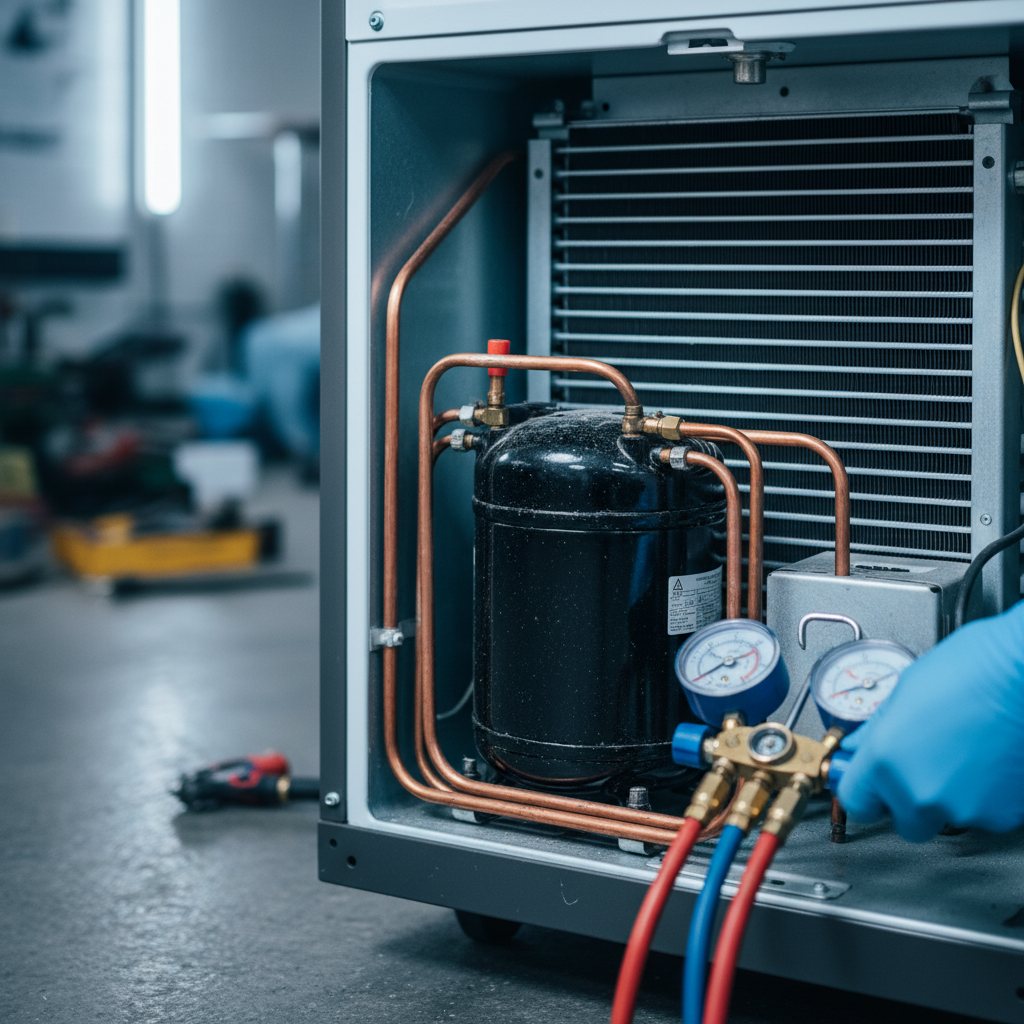
A compressor pressurizes refrigerant to move heat from inside the fridge to the room. Failures stem from electrical issues, mechanical wear, or refrigerant problems. Proper diagnosis checks controls, windings, start devices, pressures, and leaks to separate true compressor failure from airflow or control faults.
Here’s the gist: the compressor raises refrigerant pressure and temperature, the condenser coil rejects heat to your kitchen, and the metering device drops pressure so the evaporator can absorb heat from your food compartments. Failures appear as locked rotors, worn valves, shorted windings, control faults, or refrigerant leaks that starve the evaporator.
- Core components: compressor, condenser coil and fan, capillary/expansion device, evaporator coil and fan, sensors, and control board.
- Common failure paths:
- Electrical: failed start relay/capacitor, damaged wiring, or control board faults.
- Mechanical: worn bearings/valves, locked rotor, overheating from poor ventilation or heavy loads.
- Refrigerant-related: undercharge/overcharge, micro-leaks, moisture contamination, or non-condensables.
- Diagnosis essentials:
- Measure supply voltage, winding resistance, and current draw against model specs.
- Attach manifold gauges to read suction and head pressures relative to ambient temperature.
- Inspect condenser cleanliness and fan operation; check door gaskets and damper function.
- Use leak detection (electronic/sniffer, UV dye) when low charge is suspected.
- Field note: airflow blockages and relay failures frequently mimic “bad compressor” symptoms; thorough testing prevents unnecessary sealed-system work.
Pricing Factors for Refrigerator Compressor Repair
Compressor-related quotes reflect diagnostics, parts, refrigerant, and labor time. Brand and model, refrigerant type (R600a vs. R134a), accessibility, and the scope of sealed-system work shape the final number. Trust providers who explain each line item and back work with a written parts-and-labor warranty.
Pricing sections online often focus on averages. What matters more is how your specific model behaves under test and the environment it lives in. In our downtown service area, counter-depth and built-in units in tight alcoves commonly add removal/reinstall time and require careful ventilation checks to avoid heat-related repeat issues.
- Brand and model: premium built-ins and counter-depth designs can require added labor for access.
- Refrigerant type: R600a units call for specialized handling and precise charging procedures.
- Parts sourcing: OEM vs. quality compatible parts and lead times influence scheduling and repair sequence.
- Scope of work: start components only vs. full compressor replacement with filter-drier and evacuation.
- Access and environment: tight condo kitchens, custom panels, or poor ventilation increase complexity.
- Verification: nitrogen pressure testing, deep vacuum, and charge verification ensure reliability.
- Warranty: written terms on both parts and labor meaningfully reduce post-repair risk.
Types of Compressor Repairs and Sealed-System Methods
Not every cooling issue needs a new compressor. Many failures trace to start components, control boards, fans, or small refrigerant leaks. Certified techs escalate methodically: confirm airflow and controls, service start gear, repair leaks, then consider compressor replacement only if performance still falls short.
Our escalation ladder keeps costs purposeful and progress measurable. We address external causes first (airflow, relays, defrost controls) because they’re common and faster to validate. Only when data indicates internal compressor wear or persistent sealed-system loss do we propose replacement—paired with drier changes, evacuation, and weighed-in charges for durable results.
- Start system service: relays and capacitors are typical wear items; replacing them can restore normal starts.
- Airflow corrections: condenser cleaning, fan repairs, and leveling stop overheating and short cycling.
- Control fixes: defrost and sensor repairs resolve iced evaporators that mimic sealed-system faults.
- Leak repair + recharge: locate and repair leaks, replace drier, evacuate deeply, and weigh in the charge.
- Compressor replacement: when windings are shorted, rotors seized, or performance is irrecoverable.
- Post-repair validation: stabilized pressures/temps, proper frost pattern, and steady cabinet temperatures.
Best Practices to Avoid Repeat Compressor Problems
Good maintenance and installation habits protect your sealed system. Keep coils clean, ensure ventilation, and level the unit. After any sealed-system service, insist on proper evacuation, accurate refrigerant charging, leak checks, and documentation. A strong warranty completes a durable repair.
We’ve seen repeat failures tied to simple oversights: dusty coils, crimped water lines restricting airflow, and fridges pushed tight against walls. A few minutes of preventive care, two to three times a year, pays off in quieter operation and longer component life—especially in pet-friendly homes where condenser dust builds fast.
- Ventilation and spacing: follow manufacturer clearances; avoid pushing the cabinet tight against walls.
- Condenser hygiene: vacuum dust from coils 2–3 times per year; monthly in homes with shedding pets.
- Stable power: use a dedicated outlet; avoid low-quality extension cords or power strips.
- Door seal care: clean gaskets and replace when brittle to prevent unnecessary runtimes.
- Leveling matters: doors should close on their own; uneven footing stresses hinges and airflow.
- Right-size loads: overpacked fridges block airflow; underloaded freezers warm faster when opened.
- Document service: keep reports and part numbers; they speed future diagnostics and warranty claims.
Tools and Resources (For Homeowners and Pros)
Homeowners need basic tools for airflow and seal checks; pros need certified refrigerant tools. For safety and compliance, sealed-system work belongs to trained, insured technicians who handle recovery, evacuation, and charging with proper equipment and certifications.
DIY is great for cleaning coils, leveling, and checking door seals. Anything involving refrigerant or brazing is professional territory. Our technicians are licensed, insured, and TSSA-certified, which means we’re qualified for sealed-system work in multi-unit buildings and detached homes across the GTA.
- Homeowner kit: vacuum with brush attachment, flashlight, level, thermometer, and mild gasket cleaner.
- Pro tools: manifold gauges, vacuum pump, nitrogen tank/regulator, recovery machine, scale, leak detector, brazing gear, R600a-rated tools as applicable.
- Credentials: look for certified refrigerant handling and safety credentials (e.g., TSSA in Ontario).
- Manuals/specs: model-specific service data ensures correct pressures and charge amounts.
- Warranty docs: keep your receipt; insist on written parts-and-labor terms.
Repair vs. Replace: A Practical Framework
Choose repair when diagnostics isolate a clear, correctable fault and the appliance is in good condition. Consider replacement for very old units, repeated sealed-system failures, or when energy savings and reliability gains outweigh repair value. A written diagnosis makes the decision straightforward.
Here’s the thing: sentiment aside, the smart choice weighs age and condition against reliability and energy use. If diagnostics reveal minor external faults, repair is usually the efficient play. If internal wear is severe or the unit lags modern efficiency, replacement may deliver a better long-term outcome—especially for heavy-use family kitchens.
| Factor | Repair Favors | Replace Favors | How We Help |
|---|---|---|---|
| Age & condition | Newer, well-maintained, first failure | Very old, visible rust, repeated issues | We document condition and history |
| Failure type | Start relay, fan, minor leak | Severe sealed-system wear | We run pressure/electrical tests |
| Efficiency | Comparable to new models | Energy-hungry legacy design | We discuss usage patterns |
| Parts access | Readily available parts | Obsolete or long lead times | We confirm timelines |
| Warranty | Strong parts & labor terms | No coverage or unclear terms | We provide 180-day coverage |
Step-by-Step: Our Sealed-System Diagnostic Process
Our method confirms or rules out compressor failure before major work. We verify power and controls, measure electricals, read pressures, inspect airflow, and check for leaks. Only when data supports a sealed-system fault do we propose repairs—with photos, readings, and a written plan.
Process transparency is key. We record symptoms, collect photos and meter readings, and summarize options with timelines. That documentation supports warranty claims and helps building management or insurers understand the cause and remedy—useful for high-rise condos where access and approvals can add steps.
- Intake & symptoms: capture make/model, age, noises, and cooling patterns.
- Basic checks: supply voltage, wiring, control responses, fans, and door gaskets.
- Start system test: relay/capacitor inspection and substitution if indicated.
- Pressure readings: attach gauges; compare to ambient and manufacturer specs.
- Leak search: electronic sniffers or dye when charge issues are likely.
- Documentation: photos, numbers, and findings summarized clearly.
- Written options: repair paths with parts timelines and warranty terms.
- Validation: post-repair temperature and frost-pattern confirmation.
Real-World Case Studies from Downtown Toronto
Condo kitchens and brand variety demand flexible, certified service. These quick snapshots show how thorough diagnostics separate look-alike symptoms and keep repairs focused, fast, and warrantied—so you get cold, quiet performance again with minimal disruption to daily life.
We regularly service fridges in high-rises around Union Station, the Financial District, and the waterfront. Many are counter-depth models in snug alcoves, which makes airflow and installation details critical. A few recent examples illustrate how methodical checks avoid unnecessary compressor work and deliver same-day results.
- Case 1 – Samsung French door, Harbor St. condo: warm fridge, clicking start relay. Replaced start components, cleaned condenser, verified pressures within spec. Unit stabilized the same day with documented readings and a 180-day warranty.
- Case 2 – LG bottom-freezer, 18 Yonge St #3509: intermittent cooling; partial frost on evaporator. Defrost sensor replaced and airflow corrected. Compressor normal, no sealed-system work required. Same-day turnaround.
- Case 3 – Whirlpool side-by-side near Union Station: low suction pressure; dye test found micro-leak at drier joint. Brazed, evacuated, weighed in charge. Temperatures normalized after monitored run-in.
- Case 4 – Bosch built-in, waterfront tower: noisy operation traced to condenser fan bearings; replacement restored proper airflow and reduced compressor runtime.
- Case 5 – GE counter-depth, Entertainment District: frequent short cycling; leveling and gasket replacement resolved door seal losses and temperature swings.

Tools We Bring and Safety Certifications
Sealed-system service requires certified refrigerant handling and the right tools. JK Appliances technicians are licensed, insured, and TSSA-certified. We recover refrigerant properly, braze with care, pull deep vacuums, and charge precisely—then verify performance and document results for your records.
Our setup mirrors industry best practices. We use nitrogen for pressure testing, replace the filter-drier on open systems, and evacuate to deep vacuum before charging by weight. We confirm stabilized temperatures (aiming near 37–40°F for fresh food, 0°F for freezers) and record pressures and amperage so you know the fix is holding.
- Recovery & charging: recovery machine, scale, and cylinders suitable for R600a or R134a.
- Leak integrity: nitrogen pressure test, filter-drier replacement, and vacuum to industry-standard levels.
- Electrical validation: clamp meters, multimeters, and safe start-up procedures.
- Documentation: model numbers, part IDs, and before/after readings on your invoice.
- Warranty: written 180-day parts-and-labor coverage on repairs we perform.
When Fast Action Matters (Food and Floor Protection)
If your fridge is warming, act the same day. Keep doors closed, move perishables to a cooler, and book diagnostics. Quick action protects food, reduces ice melt and condensation, and prevents water from wicking into flooring or cabinetry—especially important in high-rise units.
Delays can compound problems. As ice melts from a frosted evaporator, water can drip, pool, and find seams in flooring. We recommend placing a towel or tray near the front edge if active defrosting is underway. Meanwhile, short smartphone videos of noises or error codes help our team match symptoms faster.
- Limit door openings: every opening dumps cold air and adds recovery time.
- Use a thermometer: track compartment temps; note trends for your technician.
- Protect flooring: prepare towels or trays near the front edge if defrosting occurs.
- Document noises: short videos help us pinpoint start-up clicks, buzzes, or fan rubs.
Need a Same-Day Diagnosis?
- Licensed, insured, TSSA-certified technicians
- Upfront, written quotes—no hidden fees or travel charges
- 90% first-visit fix rate across 10,000+ GTA households
- 180-day parts-and-labor warranty
We serve downtown Toronto condos and homes across the GTA—fast.
FAQ: Refrigerator Compressor and Cooling Questions
These concise answers help you separate myths from proven steps. For sealed-system work, rely on certified technicians. If you have brand-specific questions, share your exact model number so we can confirm parts and service details for your refrigerator.
- How do I know if my compressor is failing?
Typical clues include warm temperatures, constant running without cooling, clicking as the start relay cycles, or unusual buzzing. A proper check measures voltage, winding resistance, current draw, and refrigerant pressures to confirm whether the compressor or another part is at fault. - Can a compressor be repaired, or does it always need replacement?
Some issues are external—start relays, capacitors, wiring, controls, or airflow. When the internal mechanism is damaged or seized, replacement is the reliable fix. Accurate diagnostics prevent unnecessary sealed-system work and ensure you invest in the right solution. - Is it safe to keep using the fridge if cooling is weak?
It’s best to minimize use. Warm temperatures risk food safety, and extended runtimes can worsen wear. Move perishables to a cooler and book a same-day diagnosis to protect food and prevent moisture damage to floors and cabinets. - Do you service my brand?
Yes. We regularly work on Samsung, LG, Whirlpool, GE, Bosch, Maytag, KitchenAid, Electrolux, Miele, and Frigidaire refrigerators. Share your model number so we can confirm parts availability and any brand-specific procedures. - What warranty do you offer on sealed-system work?
Repairs performed by JK Appliances are covered by a 180-day parts-and-labor warranty, documented on your invoice. We also provide before-and-after readings so you know exactly what was done.
Key Takeaways
Treat compressor concerns as time-sensitive but solvable. Prioritize certified diagnostics, clear documentation, and a strong warranty. With the right provider, you’ll get fast answers, a precise plan, and durable cold—without surprises.
- Act quickly: protect food and flooring; schedule same-day diagnostics.
- Ask for proof: photos, readings, and a written plan reduce risk.
- Weigh the value: consider age, condition, and efficiency before approving sealed-system work.
- Insist on warranty: parts-and-labor coverage adds confidence to your decision.
Conclusion
Refrigerator compressor issues are high-stakes but manageable. The best outcomes start with quick, certified diagnostics and end with documented, warrantied work. If you’re in a downtown condo or anywhere in the GTA, JK Appliances is ready the same day to restore safe, steady cooling—professionally.
- Next steps: note symptoms, protect food, and book a diagnostic visit.
- Bring details: brand, model, and a short symptom history streamline service.
- Expect clarity: a written quote, photos, and a 180-day warranty.